A new Customer account opens after selecting Add and entering the billing address. All fields marked with  indicate the minimum information needed to create an account. Learn more about using one of the navigation buttons or generating account specific statements as needed.
| Access |
| Grant permission to User Profiles in Access User Profiles > select a User Profile > Menu Security > Accounts Receivable module > Access Customers. |
Search for existing customer using an active search, learn more here, or by using Find, additional information can be found here.
Learn more about the account tabs that allow setting account defaults and contain account activity here.
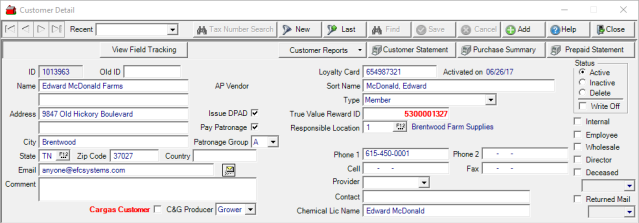
An account ID is automatically assigned when Add is selected.
The Old ID field is populated if the Customer account was imported from a previous system.
Up to 40 alpha-numeric characters are available on each line to provide the Name for the account. If using the optional Name 2 second line, it will print on any document that includes the Bill To address.
Provide the billing Address, up to 40 alpha-numeric characters are available on each line. If using the optional second line, it will print on any document that includes the Bill To address.
Enter the Zip Code to automatically populate the City and State fields. Set the parameter Use City/State/Zip from User's default Inventory Site to set the Inventory Site's City, State and Zip code as the defaults for new Customer accounts. Find this option in Merchant Ag FIN > Admin > Installation > Access Parameters > AR > Customers >General.
An accounts payable Email address can be entered.
A Comment of up to 300 alpha-numeric characters can be entered. This information displays in the Select Customer grid when searching for a Customer.
 The Cargas Customer checkbox selected when customers are imported when the Cargas Import Customer SRV task runs. Beginning with Merchant Ag 4.7.9.0 and above, User Profiles with permission level 4 set for Access Customer found in Merchant Ag FIN > Admin > System Security > Access User Profiles > select a Profile > Security tab > AR can select the checkbox manually.
Indicate a Customer will receive Patronage by selecting Pay Patronage. In addition, supply the 1099-PATR name found in Info-Settings.
For locations paying Patronage, a method of grouping accounts together when generating checks is by selecting a Patronage Group using the drop down list.
The default selection if an account is a Commodities & Grain Producer is No. Use the drop down list to select Grower or Dealer.
The Loyalty Card field is visible if a Location is participating in a Loyalty program. Enter the Loyalty Card ID number of up to 20 alpha-numeric characters to indicate the customer is participating and use the Loyalty tab within the account to view activity. If this field is blank and followed by the message Not Activated, no Loyalty Card has been entered for the Customer. See Merchant Ag FIN > Admin > Installation > Access Parameters > AR > Loyalty Cards to enable this option. If active, Access Categories provides additional information.
A Sort Name of up to 40 alpha-numeric characters are required. This information can be used on both the AR Aging and Customer Collections report. This field can be set to required if the parameter Require the Use of a Sort Name for Customer is selected in Merchant Ag FIN > Admin > Installation > Access Parameters > AR > Customers > General is selected.
Define the Type of a customer account using the drop down list available. Select either
- Member - A member is someone who has a stake in the co-op.
- Non Member - Producer - A farmer but not a co-op member.
- Non Member - Non Producer - Neither a farmer nor co-op member.
- Member - Contract (Non voting) - A co-op member with no voting privileges.
Choose a Responsible Location by entering the Site ID or use F12 to search. Set this as a required field by selecting the Require a Responsible Location for Customers parameter found in Merchant Ag FIN > Admin > Installation > Access Parameters > AR > Customers > General.
Provide what Phone numbers are known in
|
|
|
|
Enter the primary Contact for the account, up to 20 alpha-numeric characters.
The Chemical Lic Name populates with the information entered Access Customers > Licenses. and allows this account to purchase items flagged as Restricted Chemical.
Additional flags are available for the account to indicate the account is
- Internal- Primarily used for Fuel Sales to track expenses and adds an expense General Ledger column for fuel cards associated with the account. Any AR account flagged as Internal is also excluded from the Patronage Sales report.
- Employee- Select if the Customer Account is an employee to receive any Employee Pricing offered. See Access Categories for more information.
- Wholesale -Select if the account is a Wholesale account.
- Deceased- Enter or select a Deceased Date from the drop down calendar.
- Returned Mail- Mail to the Primary address has been returned with no forwarding address provided. Use the drop down calendar to indicate the return mail date.
In Status, active is selected by default. As necessary, the status can be updated to
- Inactive - Customer is no longer an active customer, the account is excluded from most searches and reports.
- Delete - Account is marked for deletion.
- Write Off - If the customers Accounts Receivable balance is considered uncollectable and credit is no longer extended. These accounts are excluded from all reports except Written Off Customers. See Access Written Off Customers for more information.